
Cast Stone Masonry Installation and Maintenance Tips
- By: Nova Construction Team
- Published:
- Updated: December 19, 2025
Cast stone masonry is a strong and attractive substitute for natural cut stone. These architectural cast stone units provide an excellent alternative among stone products available today.
But what’s the right way to install and keep this material looking its best for years? Although it’s installed like other stonework, such as limestone, it demands specific know-how and careful attention to get a good-looking, long-lasting result.
Proper steps — like preparing the site, using the right techniques, and following regular cleaning and repair routines — will help your cast stone hold up well and look great over time.
This easy-to-follow guide takes you through every step, from assessing your site and picking out your materials to ongoing care and repairs. You’ll learn about the right way to mix mortar, set each unit, and reinforce the installation, as well as what problems to avoid.
Preparing for Cast Stone Masonry Installation
1. Site Check and Getting Surfaces Ready
Before you start setting any architectural cast stone, carefully check your site with proper construction planning. Don’t just glance around — pay attention to details like climate and how it will affect your work.
Professional installers should collaborate with design teams to ensure proper design assist protocols are followed. For example, cold or hot weather can change how the mortar sets. Follow standard cold-weather guidelines, such as those from IMIAC, to deal with temperature shifts.
Surfaces that will get mortar need to be soaked with water right before installation. This essential step helps form a good bond and keeps mortar from shrinking and cracking.
Also, make sure all flashing and dampproofing are put in just as specified. If the stone anchors pierce the flashing, seal the holes with a metal ring, rubber grommet, or approved sealant.
Don’t pour concrete directly against unprotected cast stone; use something as a separator before pouring concrete. When working with GFRC panels or similar composite materials, follow manufacturer specifications for proper integration with cast stone elements.
2. Choosing Quality Cast Stone Units
Cast stone copies the look of natural stones like limestone and granite, and even blends in with brick or terra cotta. Pick units that fit the design you want and work well with other wall materials.
Cast stone is classified as “cast stone masonry” (Division 04 72 00 in CSI specifications), with a main purpose as decorative or structural trim. It should not be confused with “simulated stone,” which is only a thin veneer and can’t support weight.
Make sure your cast stone meets ASTM standard C 1364: it should have a compressive strength of at least 6,500 psi, absorption of 6% or less, a smooth fine texture, and pass freeze-thaw tests. Each unit’s dimensions should be within 1/8 inch of plans.
To avoid damage, don’t use pieces longer than 15 times their thickness, and always carry them in the way they’ll be installed. When planning products sequencing, consider the weight and complexity of each element to ensure proper installation order.
3. Needed Tools and Safety Guidelines
Installing cast stone calls for standard masonry tools — and extra caution. Cast stone is heavy, and some pieces need two or three people (or equipment) to lift. Its edges break easily, so don’t put weight on them. Professional installation support teams can provide onsite problem solving for challenging installations.
Prepare levels, trowels, tape measures, and wedge-shaped wood shims (soaked in water before use so they shrink for easier removal). Plastic shims often come with the stone and are left in place to keep joints even.
For mechanical fastening systems, ensure you have the proper hardware to attach units securely. Wear rubber gloves (especially if working with acids or cleaners) and eye protection. Cover any exposed surfaces with paper or plastic to prevent stains from mortar splashes.
Steps for Installing Cast Stone Masonry
How to Mix Mortar for Cast Stone
Mortar is a key part of any masonry job. For most installations, use standard mortar.
When pointing (the final finishing on joints), use a mix of four parts sand and one and a half parts white mortar — never use gray mix, as it causes uneven color.
Leave about one inch empty at the surface for pointing later. Industry associations recommend specific mortar formulations for different stone features and applications.
If you need to use additives like mortar retarder or accelerator, always follow the manufacturer’s instructions, and do not use these additives in patching materials. Just before setting, soak contact surfaces with water to help the mortar stick and prevent cracks from shrinkage.
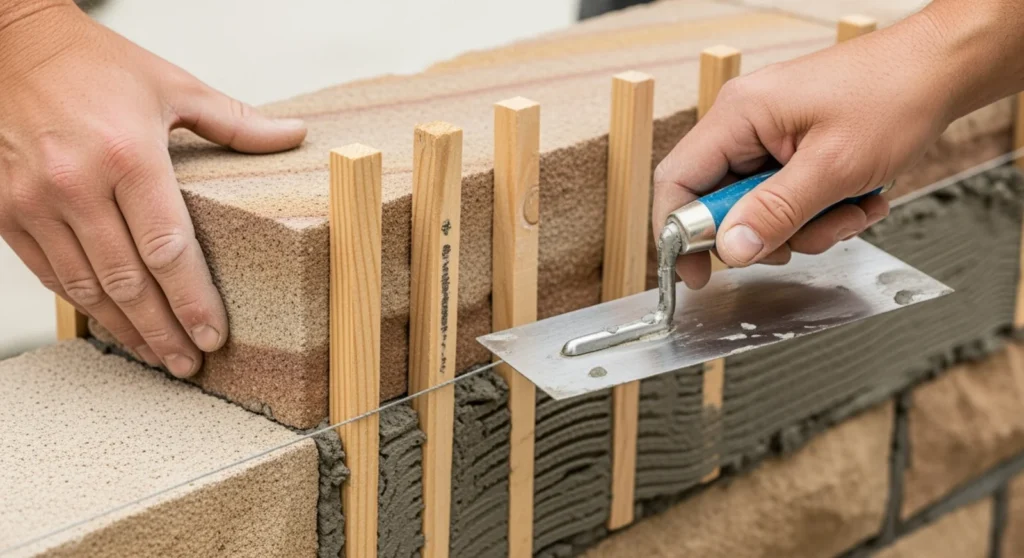
Placing Cast Stone Units Correctly
Be precise when setting each piece. Set every unit with a full bed of mortar. Use the soaked wood shims to keep things level and straight.
For big or heavy pieces (such as large mantels), it helps to let lower parts dry first before adding upper ones. Make sure all holes and anchor slots are completely filled with mortar.
Use brick ties or copper wire for anchoring to the wall, with mortar in between for a solid hold. Kerf slot with strap anchors provide excellent mechanical connection for heavier units and ensure long-term structural integrity.
You might need to drill and pin some parts for extra strength, depending on your job. Always make joint widths even and within specified limits for a neat appearance.
Making Sure Joints Have Proper Size and Depth
Even, consistent joints are important for looks and stability. Keep setting mortar back from the edges to avoid messes and to make grouting easier later.
Before applying grout, cover joint edges with blue painter’s tape, since cast stone soaks up material easily. Pay special attention to adjacent edges where units meet to ensure uniform joint spacing. Joints must be dry for the tape to stick.
After grout is put in and has started to set, pull the tape off and, if you want, smooth the joints with a scrap of carpet or burlap — but never rake them.
Ways to Anchor and Reinforce the Installation
Proper anchoring and reinforcing helps your cast stone last longer and stay safe, especially for heavy or load-bearing sections.
Most cast stone has steel bars inside for strengthening, as set by ASTM C 1364. Heavy or structural pieces may need more reinforcement. Keep large panels upright during handling to avoid cracks.
As already mentioned, use brick ties or copper wire for securing to walls, and mortar between layers for extra support. If flashing is pierced by anchors, seal thoroughly to block water from getting in.
Letting Mortar Cure and Protecting the Installation
Letting the mortar get firm and fully cure is key for strong cast stone. Drying time depends on temperature and humidity. For projects like mantels with heavy tops, let lower sections firm up before adding more weight.
Protect finished sections — cover pieces like columns, sills, or window trims until the rest of construction is done to keep them from being chipped or stained. This protection is essential for maintaining the durable finish that clients expect.
How to Avoid Mistakes When Installing Cast Stone
Typical Problems in Cast Stone Installation
Common errors include not soaking the surfaces before applying mortar (which weakens joints and leads to cracks), using the wrong mortar for pointing (causes unsightly color changes), and handling cast stone pieces without enough care or help (which breaks fragile edges).
Not taping joints before grouting leads to smeared and discolored lines, and not covering the stone during work leaves it open to scratches and staining. Forgetting to use shims or braces causes crooked installations, especially for heavier pieces.
When hairline cracks appear, they often indicate improper installation techniques. Knowing about these common mistakes helps you steer clear of them.
For complex situations, don’t hesitate to request support from experienced professionals. Contact us to learn more about how we can help you with your project!
Tips for Preventing Chipping, Cracking, and Stains
- Move and lift units upright, never dragging or bumping them on edges.
- Use enough workers or lifting tools with heavy pieces.
- Cover all exposed stone to keep off mortar and construction mess.
- Always mask joints before grouting to avoid discoloration from lime.
- Consider treating exposed elements with a water repellent (test first in an inconspicuous area to check for color change).
- Clean spills right away to keep stains from setting.
- Monitor for exposed steel reinforcement that could lead to rust and compromise structural integrity.
Maintenance for Cast Stone Masonry
Simple Cleaning Methods
Keeping cast stone looking new isn’t hard. Usually, a soft brush and water will remove regular dirt and dust, especially if the stone was sealed. For tougher jobs or right after installation, use a mild acid cleaning solution (like diluted muriatic acid), but always wet the stone first and clean in small spots.
Customers should follow manufacturer recommendations found in technical manuals or request specific cleaning guidance via email. Rub gently with a soft brush (never metal), wait about a minute, and rinse well with clear water.
Best Cleaning Products-and What to Avoid
| Safe to Use | Do Not Use |
|---|---|
|
• Soft brush • Water • Diluted masonry cleaners |
• Wire brushes • Abrasive cleaners • High-pressure washers • Strong undiluted acids |
Use commercial masonry cleaners as directed — but test a small area first. Avoid leaving acid behind joints, as it can cause corrosion.
When cleaning near open joints or where sealant is used, ask the sealant supplier to be sure the cleaner won’t cause issues. For detailed cleaning procedures, download the complete maintenance manual from manufacturer websites.
Preventing Efflorescence, Mold, and Stains
- Install flashing and drainage to keep water away from the stone.
- Soak stone before mortaring to help reduce salts reaching the surface.
- Treat features like pavers and copings with water repellents to stop stains and efflorescence.
- Make sure air can move around the stone to prevent mold.
- Clean with soft brush and water often.
- For mold, use a diluted bleach solution (test first), then rinse.
- Keep stone covered during construction to avoid mortar splashes.
- Monitor for craze patterns that might indicate moisture issues.
How to Fix and Restore Cast Stone Masonry
Fixing Chips, Cracks, and Surface Damage
Light damage like chips or small cracks can be patched. For patching, crush some extra cast stone or use sand as powder. Mix with white cement in a ratio of two parts sand or stone powder to one part cement, adding just enough water to make a thick paste.
Apply with a putty knife, shape to match the stone, and sprinkle extra powder for blending. Always test your patch first in a hidden spot to check for color match. Patch chips as soon as possible for the best color.
When hairline cracks appear along adjacent edges, address them promptly to prevent further deterioration.
Replacing a Damaged Cast Stone Piece
If a piece is too damaged to patch, you’ll need to take it out and put in a new one. Remove the broken unit carefully to avoid damaging neighboring stones.
Clean and soak the opening before installing the new piece. Use fresh mortar and anchor or reinforce just as you would in the regular install.
If you can, order the replacement from the original maker for a close color and texture match. Professional consultation can help ensure proper attachment techniques are used for replacement units.
When to Call an Expert
- Large or deep cracks, especially if they suggest movement in the wall or building.
- Serious water leaks or ongoing mold and efflorescence issues.
- Replacing or repairing large, heavy, or load-bearing parts.
- When structural integrity is compromised.
For big jobs or problems affecting the building’s structure, always call a professional. They’ll have the right tools and know-how to fix things safely and can provide ongoing installation support.
What Are the Long-Term Risks and Fixes for Cast Stone?
Weathering and Freeze-Thaw Damage
Even though cast stone is tough, weather and especially cycles of freezing and thawing can cause slow damage over time. Cast stone made to ASTM C 1364 standards must pass freeze-thaw tests, which helps, but good drainage and moisture barriers during installation are also important.
Use water repellents like silane or siloxane for extra protection on sills, coping, and pavers exposed to the elements. With proper care, these durable stone products can maintain their appearance for more than a decade.
Check for cracks or wear regularly so you can fix small problems before they get worse.
Water Leaks and Moisture Protection
Water can do long-term harm to any masonry, including cast stone. If water gets inside and is trapped, it can leave stains, cause mold, or make cracks worse in freezing weather. That’s why proper flashing and dampproofing are musts.
Flashing should be installed above windows, at breaks in the wall, and at the base; if anchors punch through flashing, carefully seal the holes. Weep holes (small drilled gaps) let trapped water out.
Make sure no mortar drops into the cavity behind the stone, as this can block drainage. This protection is essential for maintaining the structural integrity of the installation over multiple decades.
Should You Seal Cast Stone?
Cast stone doesn’t always have to be sealed to stay strong, but sealing can make cleaning easier and gives added protection against stains and water. If you use a sealer, wait until all work and cleaning are done and the stone is dry.
Always test first to make sure the sealer won’t change the stone’s color or texture. For exposed or jointed spots like copings and sills, using sealant in the joints will also help prevent water from getting in.
Have a professional do caulking and joint prep for best results.
Frequently Asked Questions
Is Cast Stone Good for All Climates?
Cast stone is built to handle different weather. By meeting strict standards and passing freeze-thaw tests, it works well even in places with cold winters. But always follow local best practices for installation — like using cold weather methods for mortar or extra waterproofing in wet areas — to make sure it performs its best. For climate-specific guidance, request technical consultation from experienced professionals.
How Long Does Cast Stone Last?
With correct selection, installation, and care, cast stone can last more than 100 years. This long life comes from its strength and careful manufacturing to meet tough standards. Project examples like historic restorations demonstrate the longevity of quality architectural cast stone.
For longest life, use the right mortar and flashing, maintain regularly, and fix problems right away. The durable nature of these stone products makes them an excellent long-term investment.
Can Cast Stone Support Weight Like a Real Stone?
Yes, cast stone can be load-bearing if it’s made and installed properly. It has similar or better strength than many natural stones (over 6,500 psi compression strength). Load-carrying parts need to be reinforced as required, and big panels or lintels need to be set correctly.
Shop drawings (by the manufacturer) and an engineer’s input help make sure heavy pieces go in the right spots and hold up as intended. When you need additional information, simply open a new window or tab to access manufacturer resources or email technical support teams. “Simulated stone” veneers, by contrast, are only for looks and can’t support weight.
Got a project in mind? Let's chat about bringing your construction vision to life!